10/24/2024
Salesforce Nonprofit Cloud vs NPSP: Find the Right Fit
When it comes to Salesforce Nonprofit Cloud vs NPSP and what’s right for your nonprofit, it helps to understand their…

Welcome to our new website! Learn more about how we help Associations succeed with Salesforce solutions. Learn More >


October 23, 2024 | Ryan Sears
In Salesforce Experience Cloud, businesses can create portals, customer service hubs, and communities that offer external users controlled access to CRM data. Built on your existing Salesforce instance, these Digital Experience Sites allow customers, partners, and employees to interact with Salesforce through a user-friendly web portal.
However, each community user typically has both a user record (for login credentials and portal-specific data) and a contact record (for core CRM information). The challenge? These two records don’t automatically stay in sync. For instance, when a community user updates their phone number on their user record, it may not reflect on their contact record.
This data inconsistency can lead to outdated reports, inaccurate customer communications, and mismatches between internal and external records. The good news? With Salesforce Flow, we can ensure that key fields like Title and Phone stay aligned between these records.
To keep Contact and User records synchronized, we’ll create two record-triggered Flows:
This ensures that changes made to either record are reflected in the corresponding record, maintaining data consistency. While this example focuses on the Title and Phone fields, this approach can be extended to any fields relevant to your business needs.
Note: When a user is created from a contact, fields like Name, Email, Title, and Phone are inherited from the contact record. Therefore, the Flow doesn’t need to be triggered on user creation. You may need to adjust this setup if you’re syncing custom fields or working with different objects.

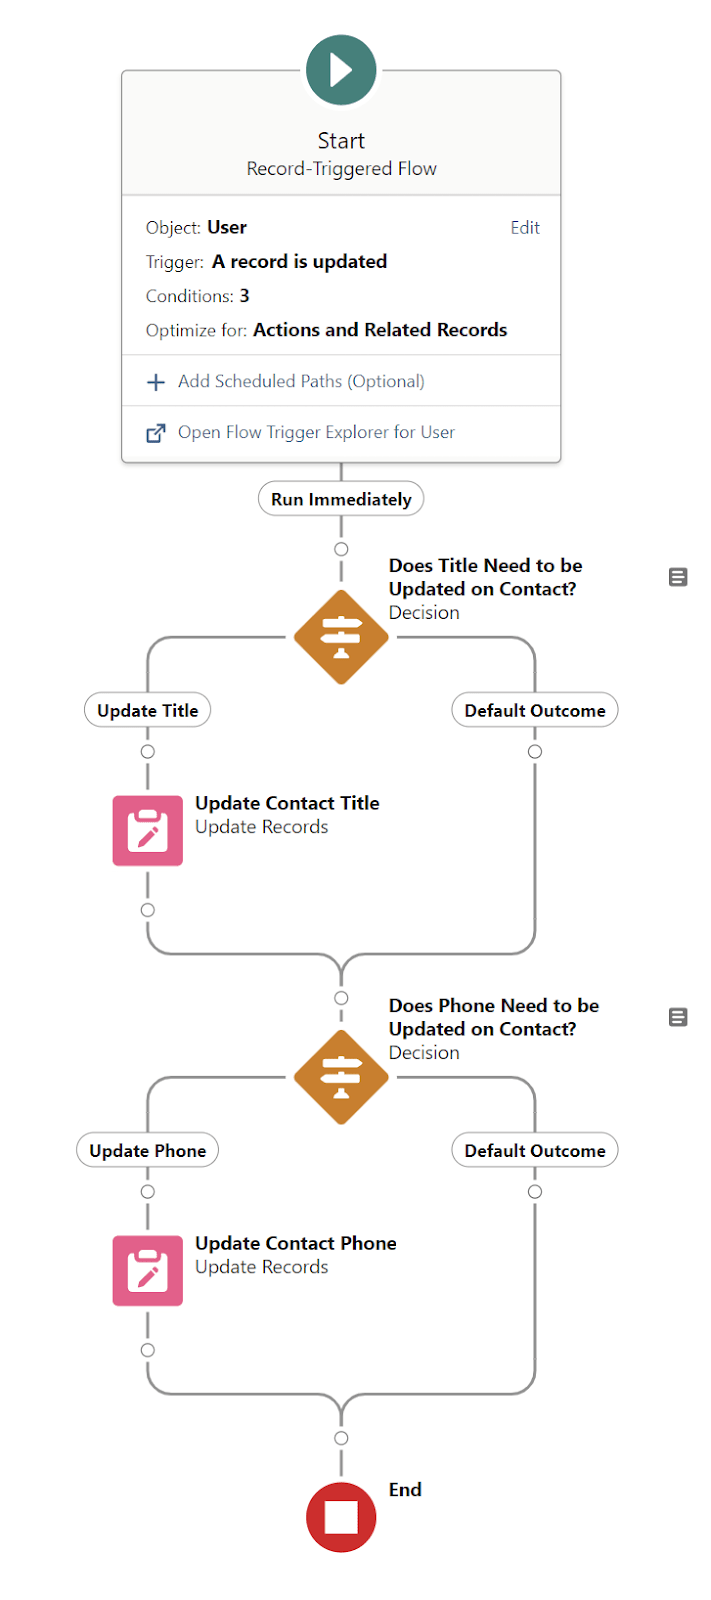
This Flow runs when a user record is updated, ensuring that changes to the user record are reflected in the associated contact record.
Here’s how we configure it:
We want to ensure the Flow runs only when necessary, so we apply two key entry criteria:

Once triggered, we check which fields have changed. A Decision Element compares the updated Title and Phone fields on the user record to those on the contact record. This ensures the Flow only continues if there’s a discrepancy between the two records.

If changes are detected in the user record and they differ from the contact record, the Flow proceeds to an Update Records Element.
This updates the contact record with the new values from the user record.

Repeat this process for each field you want to sync, adding a decision and update element for every field.
This Flow ensures that updates to contact records are reflected in the corresponding user records. Here’s how to set it up:

Unlike user records, we can’t directly determine if a contact is linked to a community user. So, we set entry criteria to trigger the Flow only when key fields, like Title and Phone, are updated.

Next, we use a Get Records Element to locate the user record associated with the updated contact. This element searches for a user whose ContactId matches the updated contact record.

We use a Decision Element to check whether a corresponding user record exists. If a user record is found, the Flow proceeds to the next step. If no match is found, the Flow ends.

If the Decision Element confirms a match, the Flow updates the relevant fields (e.g., Title and Phone) on the user record with the new values from the contact record. This keeps both records in sync.
Repeat this process for any additional fields you want to synchronize.

By setting up these two record-triggered Flows on the User and Contact objects, you can ensure that critical fields, like Title and Phone, stay synchronized between them. This avoids the issues caused by inconsistent data and improves both the user experience for community members and the accuracy of your Salesforce data.
Using Salesforce Flow to automate this synchronization saves time, eliminates manual updates, and ensures that your data remains consistent—no matter where updates originate. Whether managing a large community or just a few users, this solution keeps your records in harmony and your business running smoothly. Visit Aptaria to learn more about Salesforce and its usage and implementation.
Feel free to customize this solution to fit your organization’s specific needs or expand the logic to handle more complex data synchronization scenarios!
